A regular build pipeline for creating a release with GitHub Actions looks like this:
First you have to place a yaml-file to ./.github/workflow
Determine when you want to trigger the action
Here it will trigger the action when there is a push on main OR with a tag beginning with v
on:
  push:
    branches:
      - main
    tags:
      - "v*"
Determine the type of the OS you want to run the action
(windows, ubuntu)
jobs:
 build:
   runs-on: windows-latest
Need to checkout the repo
steps:
 - uses: actions/checkout@v4
Need to install the component with what you want to build
Ex dotnet:
- uses: actions/setup-dotnet@v4
  with:
    dotnet-version: 8.x
Build :
Create Release :
- name: Create Release
  id: create_release
  uses: actions/create-release@v1
  env:
    GITHUB_TOKEN: ${{ secrets.GITHUB_TOKEN }}
  with:
    tag_name: ${{ steps.get_version.outputs.version }}
    release_name: Release ${{ steps.get_version.outputs.version }}
    draft: false
    prerelease: false
Add Asset
- name: Add asset
  uses: AButler/upload-release-assets@v3.0
  with:
   files: ./Draft.zip
   repo-token: ${{ secrets.GITHUB_TOKEN }}
   release-tag: ${{ steps.get_version.outputs.version }}
Additional tool
Zip
If you want to Zip your release
- name: Zip
   run: Compress-Archive -Path ./YOUR_PATH/bin/Release -DestinationPath ./Draft.zip
   shell: powershell
Upload Artifact
- name: Upload Artifact
  uses: actions/upload-artifact@v4
  with:
      name: my-executable
      path: ./Draft.zip
Version as date
- name: Version as date
  id: get_version
  run: echo "::set-output name=version::$(Get-Date -Format 'yyyy.MM.dd.HHmmss')"
Requiring successful dependent jobs
jobs:
  job1:
  job2:
    needs: job1
  job3:
    needs: [job1, job2]
Final Build Script
name: Build WPF Application and Release

on:
  push:
    branches:
      - main
    tags:
      - "v*"

env: # env variables
  PROJECT_PATH: PROJECT_PATH/PROJECT_PATH.csproj

jobs:
  deploy: # can be anything
    runs-on: windows-latest
    permissions:
        id-token: write
        contents: read
    steps:
      - uses: actions/checkout@v4

      - uses: actions/setup-dotnet@v4
        with:
          dotnet-version: 8.x

      - name: Restore
        run: dotnet restore ${{ env.PROJECT_PATH }}

      - name: Build
        run: dotnet build ${{ env.PROJECT_PATH }} -c Release --no-restore

      - name: Publish
        run: dotnet publish ${{ env.PROJECT_PATH }} -c Release --self-contained -r win-x64 -p:PublishSingleFile=true --no-build

      - name: Zip
        run: Compress-Archive -Path ./YOUR_PATH/bin/Release -DestinationPath ./Draft.zip
        shell: powershell

      - name: Version as date
        id: get_version
        run: echo "::set-output name=version::$(Get-Date -Format 'yyyy.MM.dd.HHmmss')"

      - name: Create Release
        id: create_release
        uses: actions/create-release@v1
        env:
          GITHUB_TOKEN: ${{ secrets.DEV_TOOL_TOKEN }} # this is a custom token
        with:
          tag_name: ${{ steps.get_version.outputs.version }}
          release_name: Release ${{ steps.get_version.outputs.version }}
          draft: false
          prerelease: false

      - name: Add asset
        uses: AButler/upload-release-assets@v3.0
        with:
         files: ./Draft.zip
         repo-token: ${{ secrets.DEV_TOOL_TOKEN }} # this is a custom token
         release-tag: ${{ steps.get_version.outputs.version }}
Potential issues
Resource not accessible by integration
Error: Resource not accessible by integration // [!code error]Solutions
1- Disable and re-enable the integration: Go to the repository's settings, navigate to the "Integrations & services" (or similar) section, find the GitHub Actions integration, and disable it. Then, re-enable it again. This can help refresh the integration's access to the repository. 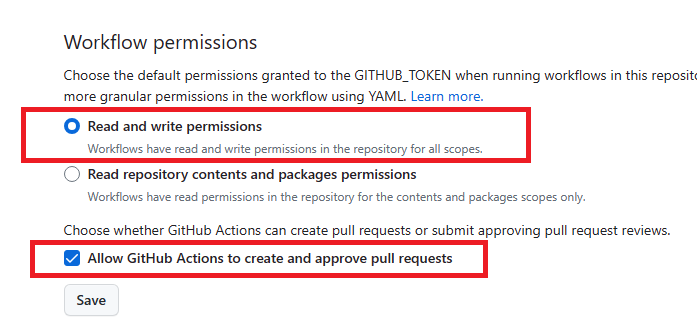
2- Add permission in the workflow
permissions:
id-token: write # This is required for requesting the JWT
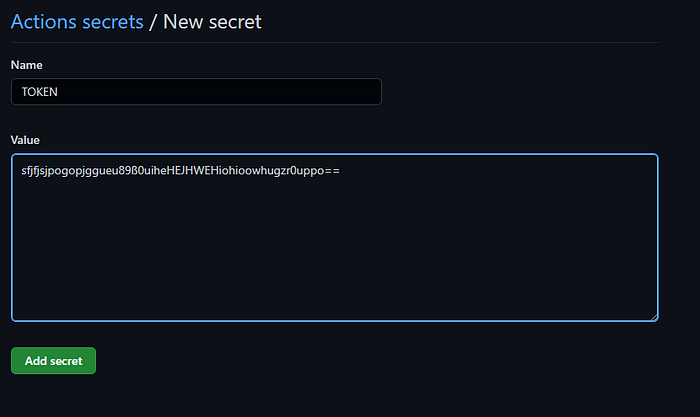
contents: read # This is required for actions/checkout3- Use a Personal Access Token Navigate to the settings of our repository 
Add a new secret so we can store the authentication token 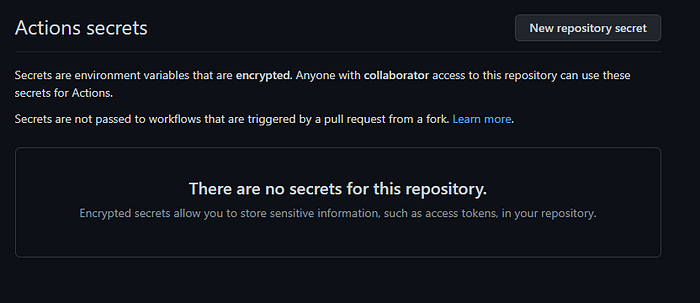
Click Add secret Et voila, Settings > Secrets > Actions will now list your recently added secret token